


Updating Content on Amazon Seller Central— Macarta
Detailed step-by-step instructions on how to update your title, bullet points, and product description copy on Amazon Seller Central.
Amazon Seller Central. You know what it is. It’s the hub that allows you to access your seller account, manage your sales, and generally run your business on the Amazon marketplace. But what do you do once you’re logged in and ready to get started? Navigating the process can be overwhelming, but we’re here to help.
Continue reading this article for detailed step-by-step instructions on how to update Amazon Seller Central with your:
- Title
- Bullet points
- Product description copy
Trust us, we’re well aware of the challenges of navigating Amazon’s backend. That’s why our team of Amazon experts came together to write this succinct, step-by-step guide for content updates in Amazon Seller Central.
We’ve gone through this process more times than we can count, and with the help of this handy guide, you’ll be quickly updating PDPs in no time!
- Looking for help updating content in Vendor Central? Check out How to Update Content on Amazon Vendor Central.
Looking for help with product uploads in Seller Central? Check out our post on how to upload products on Amazon Seller Central with File Feeds.
Updating Items Manually
For Amazon sellers running smaller catalogs, manually updating content regularly may be all that’s required.
From the Seller Central home screen, in the Inventory tab, select Manage Inventory from the dropdown.
In the search bar on the left-hand side of the toolbar, search for the products you want to edit. Once they populate, click the Edit button to the right of the product. You’ll be redirected to the Edit Product Details page; here, you can edit both backend and consumer-facing details, like the title and bullet points.
Repeat this process if you have additional products that need content updates.
Bulk Content Updates with File Feeds
Making bulk content updates in Amazon Seller Central requires even more attention to detail than on Vendor Central:
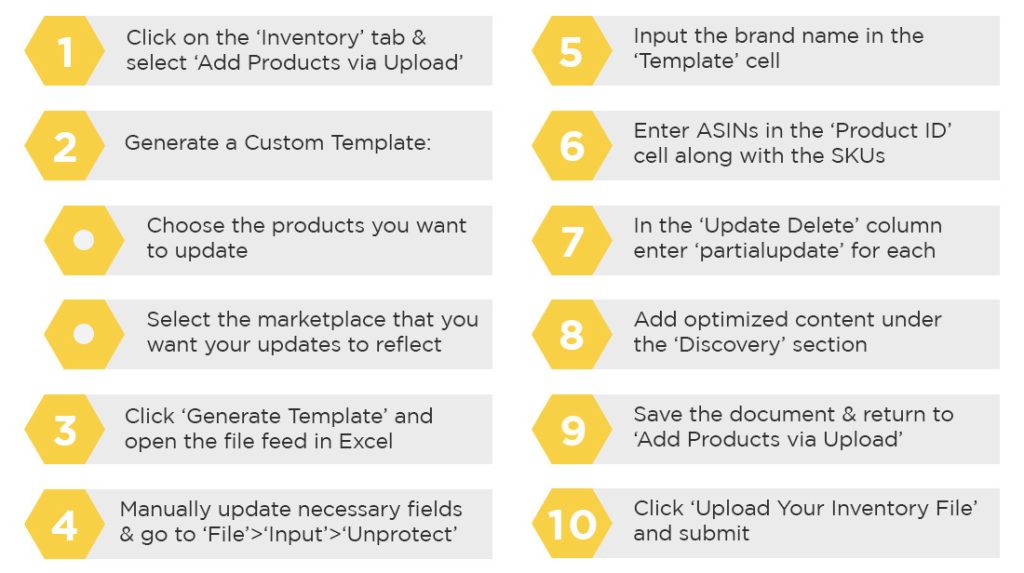
- Starting from the Seller Center home page, select the Inventory tab, then click on the Add Products via Upload from the dropdown.
- Follow the below steps to generate a custom template:
- Step 1: Choose the categories of the products you want to update. There are many category options available. Do your best to locate the most relevant product category using the sub-category menu.
- Step 2: Select the marketplace in which you would like your updated content to reflect.
- Step 3: For the majority of use cases, nothing is required in the third step. The system defaults to Advanced, and everything required for content updates is present there.
- The additional Custom option allows you to specify exactly which columns you’d like to utilize for content uploads. While some may enjoy this customizability, this feature is unnecessary for the vast majority of users.
- Once each step is complete, click Generate Template. A file will automatically download. Once complete, open the file feed in Excel.
- This sheet, unfortunately, does not come auto-populated, so you will have to manually update the necessary fields.
- Once you open the document, go directly to the File tab in Excel >click Input > click Unprotect. This gives you editing access which allows you to use formulas and other handy Excel functions.
- Now it’s time to start filling in the data. Under the Template cell, input the brand name exactly as it is registered with Amazon (exact capitalization and spelling are important). Under Product ID input all of the ASINs you’re updating, along with the associated SKU for each product.
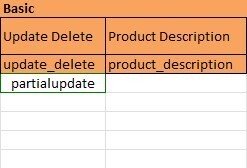
- Next, find the Update Delete column, under the Basic section. You must write partialupdate in these cells for every item you are updating.
- WARNING: If you do not enter partialupdate or leave the cells blank, you could inadvertently override your listings if you reupload the Excel sheet, removing almost all the content you currently have uploaded.
-
 .
. 
- The last step in the process is adding your optimized content. Under the Discovery section, you will find the fields to enter the title, bullet points, and product description. Enter the updated title and copy for each ASIN there.
- Once you’ve finished updating the content, save the document and return to the Add Products via Upload page in Amazon Seller Central.
- Click Upload Your Inventory File Tab, and when redirected either drag/drop or simply upload the Excel sheet using the uploader.
- Once the upload is complete, you’ll be redirected to the Monitor Status Page. There, you’ll be notified if there are any errors in the sheet. If an error occurs, you must update the original document for reupload. You can choose to remove the successfully updated items from the sheet or leave them in during the troubleshooting and reupload process.
- Once the sheet has been resubmitted with zero errors, congratulations! You’ve successfully updated content in Seller Central!
Do you still have questions on Amazon Central best practices? Are you running into errors that don’t seem to make sense? We’re more than happy to lend a hand.
Macarta is a multinational full-service marketplace agency specializing in retail media to drive growth and sustained success for its brand partners. Reach out to us here, and let’s get started.